(Some of my hintervision thoughts are posted elsewhere. Here is an article from our Cloud Engagement Hub publication on Medium)
One of my greatest joys at IBM is showing customers how they can use IBM solutions to solve problems and improve their business. A common problem we hear is that enterprise clients need to run their apps locally, while leveraging the value of the cloud. In general they want to keep sensitive data local while integrating cloud benefits such as rapid deployment, continuous delivery, and microservices, and they want this to include Java applications.
Recently we released IBM Cloud private, a Kubernetes-based private cloud, which runs in your data center. You can start small, manage it yourself, and grow it to run whatever workloads you want. IBM Cloud private provides key runtimes and services that you depend on, such as Liberty, Db2, MQ, Microservice Builder, Redis, and much more. (learn more here).
In this article, I will show how we stood up our private cloud, and used this private cloud to deploy a stock trader application. This stock trader application is a Java microservices app that is running in Liberty, uses Db2, MQ, and Redis, and can also connect to a public cloud.
Here is a quick video summarizing what we built that will provide context for the rest of this article.
My hope is that you can repeat our success by following what we did, and if you have any questions, feel free to join the conversation in the comments.
The Architecture
We set out to develop a stock trader application that would run using local data, yet connect to the public cloud to get stock quotes and post messages when a customer’s loyalty level changed….a true Hybrid solution. We needed a database, a messaging queue, and a local cache. We also wanted the ability to continuously make code changes and update only what was needed. The result was an application architecture shown in Figure 1.
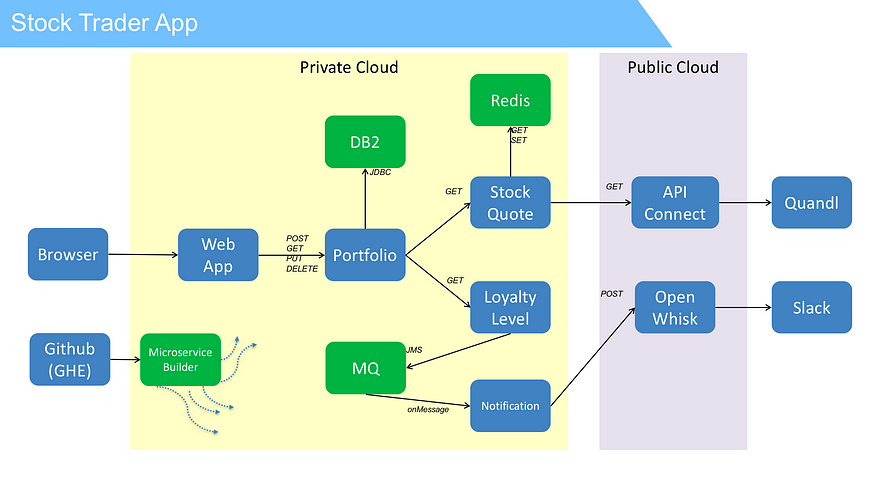
Figure 1: Application architecture including GitHub Enterprise and Microservice Builder to support continuous delivery goals
With that in mind, we then architected what our private cloud should look like. The results of this is shown in Figure 2.

Figure 2: Cloud layout, including DSM to help manage the database, and four VMs to run our cloud.
I cannot stress enough how important this layout step is. As you will see, there is a lot of communication that is required between the developer and the cloud administrator. The alignment between app and cloud architecture is essential to ensure that the solution meets the need of both parties.
The Plan
Our plan was straight-forward:
- Set up IBM Cloud private
- Set up the services that we needed
- Add secrets to improve developer productivity
- Run the application in IBM Cloud private
- Integrate with Microservice Builder
- Continuously deliver!
To truly understand what our clients would experience, we decided to role-play the personas we were designing for: Todd the cloud admin, and Jane the enterprise developer. In the end, this was a fantastic way to ensure that we could realistically prepare all aspects of the stock trader solution.
Setting Up IBM Cloud private
The first thing we did was set up IBM Cloud private. We followed the detailed instructions here. We got pretty good at it so now we can do it in about 1.5 hours. As you follow these instructions, here are a couple of tips:
- Use the same node as both Master and Boot.
- When you set up your SSH keys across your nodes, run the commands from the master node to itself.
- If your VMs are running on different subnets, add the following line to your config.yaml:
calico_ipip_enabled: true
Once the IBM Cloud private environment was installed, we took a breath and opened the IBM Cloud private UI (Figure 3).
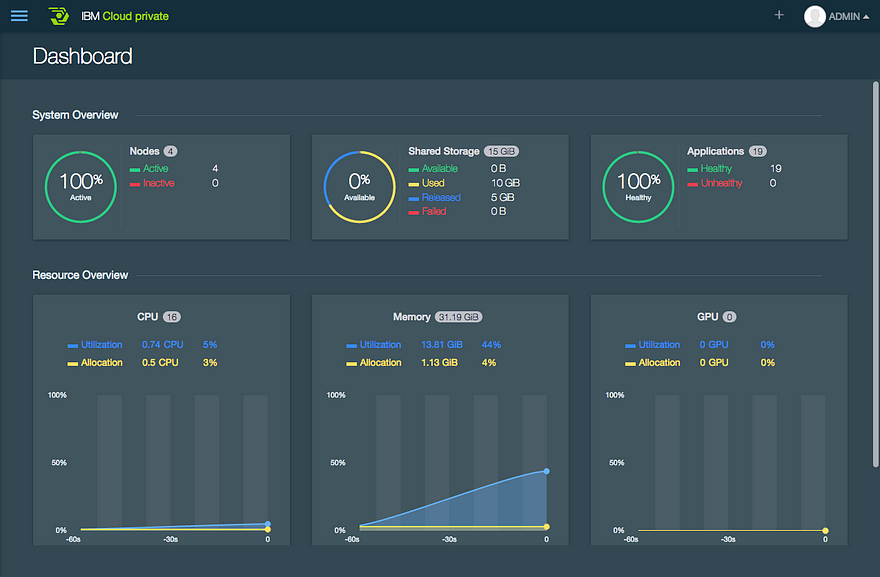
Figure 3: Manage the apps, storage, network, and compute nodes from this operations UI.
We also decided to install the Kubernetes Dashboard UI as another way to view IBM Cloud private (Figure 4). To install the Kubernetes Dashboard UI, see https://kubernetes.io/docs/tasks/access-application-cluster/web-ui-dashboard/
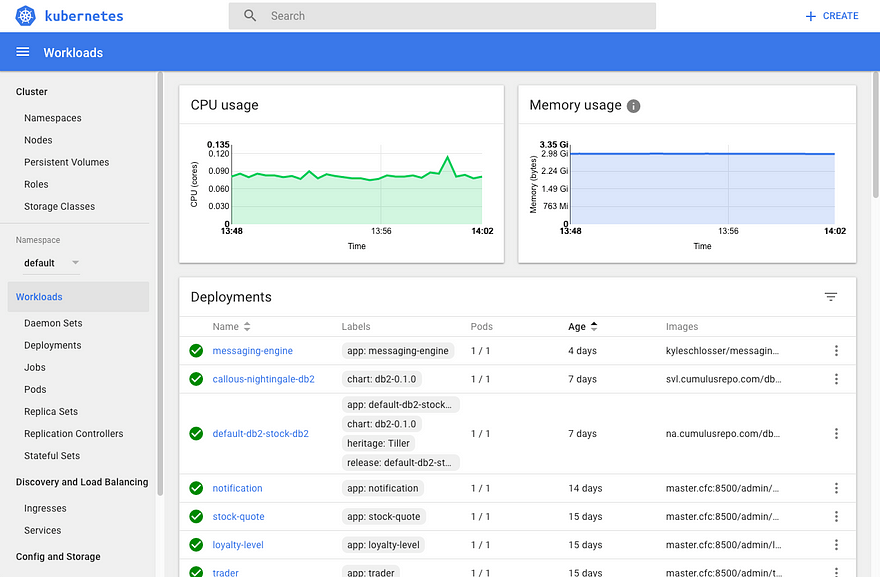
Figure 4: Kubernetes Dashboard UI, an opensource UI provided by Kubernetes
Our next step was to install each service that we needed: Db2, MQ, and Redis.
Seting Up Services
When I talked with our developer, we wanted to incrementally move into IBM Cloud private. Why? Well, there are many variables so if we could just try one thing, make it work, then try the next thing, we ended up achieving our goal faster than setting up the whole solution and hope it “just worked”.
For example, we wanted to test out the services before he moved his application into IBM Cloud private. Kubernetes nicely supports that by offering two ways to network into a service: Internally through “ClusterIP”, and externally through the proxy server using “NodePort”. Take a look at our MQ service in Figure 5:

Figure 5: the `kubectl describe` command showing service details
You will see an internal port 1414 only accessible inside the Kubernetes cluster by using the default-mq-mq:1414, and a NodePort 31966 that is available outside the private cloud using proxyNodeIPaddress:31966.
As a result, our developer could access MQ from his running code (basically changing one variable) and we could confirm that the services worked great. Then, once the app was using all services from the developer’s workstation, we added secrets and moved his app inside the private cloud.
OK, now we actually set up the services.
Setting Up DB2
Thanks to a handy recipe, installing DB2 was easy:
https://developer.ibm.com/recipes/tutorials/deploy-db2-into-ibm-cloud-private/
Once Db2 was running, we had to prime the database with the tables that the app needed.
Since Db2 installs automatically with a database called ‘sample’. We then added a ‘Stock’ and ‘Portfolio’ table to this database. We also added a configuration option that automatically deleted all rows in the Stock table that referenced deleted row in the Portfolio table. That way, the code didn’t have to iterate over each stock for a portfolio and delete it, prior to deleting the portfolio itself.
These are the commands we ran. We could have run this command from the DB2 command line: “db2 -tf createTables.ddl” but we installed DSM, so we ran these as SQL statements in DSM:
CREATE TABLE Portfolio(owner VARCHAR(32) NOT NULL, total DOUBLE, loyalty VARCHAR(8), PRIMARY KEY(owner));
CREATE TABLE Stock(owner VARCHAR(32) NOT NULL, symbol VARCHAR(8) NOT NULL, shares INTEGER, price DOUBLE, total DOUBLE, dateQuoted DATE, FOREIGN KEY (owner) REFERENCES Portfolio(owner) ON DELETE CASCADE, PRIMARY KEY(owner, symbol));
To verify it’s all working, we connected DSM to our DB2 database (Figure 6)

Figure 6: DSM lets you monitor multiple databases, run SQL statements, and view the database content through the Administer menu.
We could also verify that our Db2 setup is successful by running the following SQL statement:
SELECT * FROM Employee
Eventually, once our stock trader app was running, we replaced Employee, a table in the Sample database, with Portfolio, our table with our private data.
Setting Up MQ
To set up MQ, we followed the recipe here:
https://developer.ibm.com/recipes/tutorials/deploy-mq-into-ibm-cloud-private/
Once MQ was running, we needed to create the message queue that the app expected. I logged into the MQ UI and created a queue called, ‘NotificationQ’ (Figure 7)

Figure 7: Create the NotificationQ
Next, we had to authorize the app user ID ‘app’ to the queue. The MQ instructions said NOT to use the default admin ID, but to use the default application ID, ‘app’.
When you add ‘app’, it will show the group name as ‘mqclient’. From the MQI section, select the Browse, Get, and Put options (Figure 8).
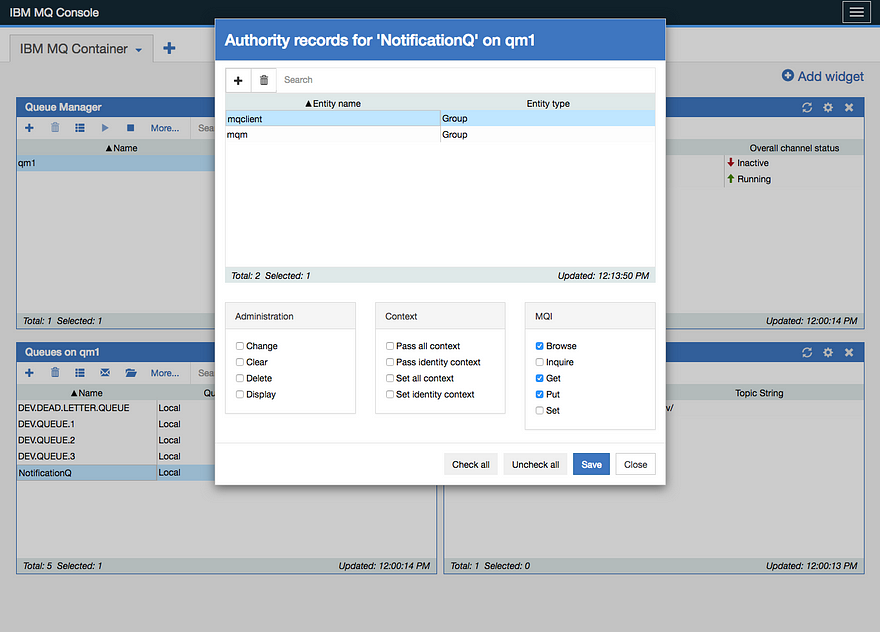
Figure 8: ‘mqclient’ was added with the correct authority to browse, get, and put.
Setting Up Redis
To set up redis, we used the Redis app located in the IBM Cloud private App Center.
First, log into the IBM Cloud private UI: https://masternodeIP:8443/#/dashboard/ with the default user ID and password set to admin/admin. Once logged in, select the left menu and then “App Center”. Find Redis, and install it.
Setting Up API Connect and Quandl
As you’ve seen in past blogs, this stock trader app is built from earlier editions that use API Connect in IBM’s public cloud to then call Quandl. This version does not require API Connect, but if you want to learn more, and read how we’re calling Quandl to get stock quotes, read about it here.
Setting Up OpenWhisk and Slack Messaging
Another capability we built from previous editions of the stock trader application was to call an OpenWhisk action that sends a slack message. To get that portion working, you’ll want to read about it here.
Creating secrets
We have a recipe describing why secrets are so useful, and you can read it here. In a nutshell they make your application portable by letting you define custom, cloud-specific information regarding how the app can use each service.
Here are the secrets that we created for our stock trader application.
MQ Secret
First, we found the MQ service name
kubectl get svc
Then viewed the properties
kubectl describe service default-mq-mq
If you set up the services with NodePort, two ports will appear for internal and external access to the application. And another two ports for the UI. By default, port 1414 is what the application uses when the app is running inside the private cloud.
Here’s the secret we created:
kubectl create secret generic mq --from-literal=id=app --from-literal=pwd= --from-literal=host=default-mq-mq --from-literal=port=1414 --from-literal=channel=DEV.APP.SVRCONN --from-literal=queue-manager=qm1 --from-literal=queue=NotificationQ
DB2 Secret
First, we found the DB2 service name
kubectl get svc
Then viewed the properties
kubectl describe service callous-nightingale-db2
Finally, we created this secret:
kubectl create secret generic db2 --from-literal=id=db2inst1 --from-literal=pwd=password --from-literal=host=callous-nightingale-db2 --from-literal=port=50000 --from-literal=db=sample
Redis Secret
This Redis secret should actually be called, “the stock quote microservice secret” because it contains details to access Redis, as well as details to access Quandl, a provider of stock quotes. We found we could call Quandl 50 times per day without registering, or if we registered (no cost), it bumped that up to 300 calls per day (To register for Quandl, see http://quandl.com/ ).
We ran this to find the Redis service name
kubectl get svc
Then viewed the properties
kubectl describe service worn-horse-redis
To create the secret that the application can use, we needed to get the Redis password secret that the Redis install already created, and then add it into the secret our developer would use. Here’s what we used to set a password parameter in Kubernetes:
REDIS_PASSWORD=$(kubectl get secret --namespace default worn-horse-redis -o jsonpath="{.data.redis-password}" | base64 --decode)
Finally, we created this secret (using the password parameter, service name, port, and our quandl key. If you don’t want to register, just leave the quandl-key field empty):
kubectl create secret generic redis --from-literal=url=redis://x:$REDIS_PASSWORD@worn-horse-redis:6379 --from-literal=quandl-key=<yourQuandlKey>
OpenWhisk Secret
Lastly, we created our OpenWhisk secret. This is useful for any Bluemix service you want to call from IBM Cloud private.
As mentioned above, we reused the work described in our earlier blog. Read about it here.
kubectl create secret generic openwhisk --from-literal=url=https://openwhisk.ng.bluemix.net/api/v1/namespaces/<yourBluemixID>_dev/actions/PostLoyaltyLevelToSlack --from-literal=id=<apiID> --from-literal=pwd=<apiPWD>
Running the application in IBM Cloud private
At this point, we decided to test the application inside IBM Cloud private (and you can too). Why? Because our code was in Eclipse on our developer’s laptop, and it was the next incremental step to build containers and then deploy them into IBM Cloud private. For us, it was a whole additional set of variables to move our code into GitHub and connect to our private cloud through Microservice Builder that we were not ready for yet (We’ll walk through how to do that next)
To build and run the app, follow these steps:
kubectl apply -f https://github.com/IBMStockTrader/trader/blob/master/manifests/deploy.yaml
Once the containers are running, you should get to the app UI with the following URL:
http://proxyIP:traderPort/trader/summary
The proxy IP is the IP address of the VM acting as proxy node. The ‘traderPort’ is the external NodePort, and can be found using the same commands as above.
We ran this to find the Redis service name
kubectl get svc
Then viewed the properties
kubectl describe service trader-service
Make sure you use the NodePort, usually in the 30000 range.
Integrating with Microservice Builder
You may be asking, “I have the app running now, why bother with Microservice Builder”? For us, while it was tedious to set up Microservice Builder, we found that integrating with Microservice Builder saved us an amazing amount of time!
If you want to continuously deliver and enhance your app’s micro-services, you should use Microservice Builder. Our experience was that whenever we wanted to tweak a behavior, we could just change the code in GitHub, commit the changes, and…PRESTO, Microservice Builder would detect the changes, build them, and deploy updated containers into our private cloud.(Figure 9 and 10).
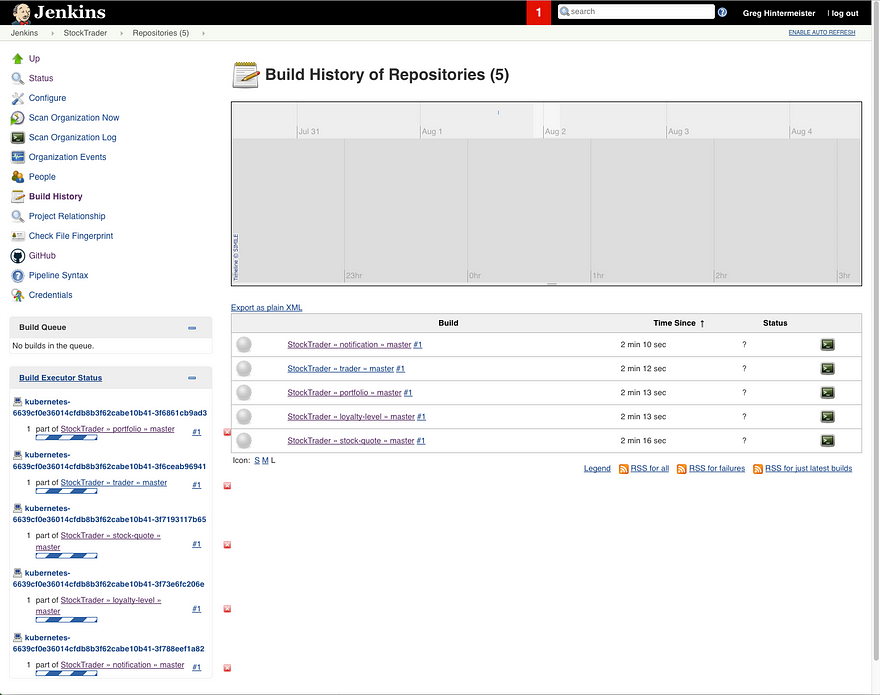
Figure 9: Micro-services are being built
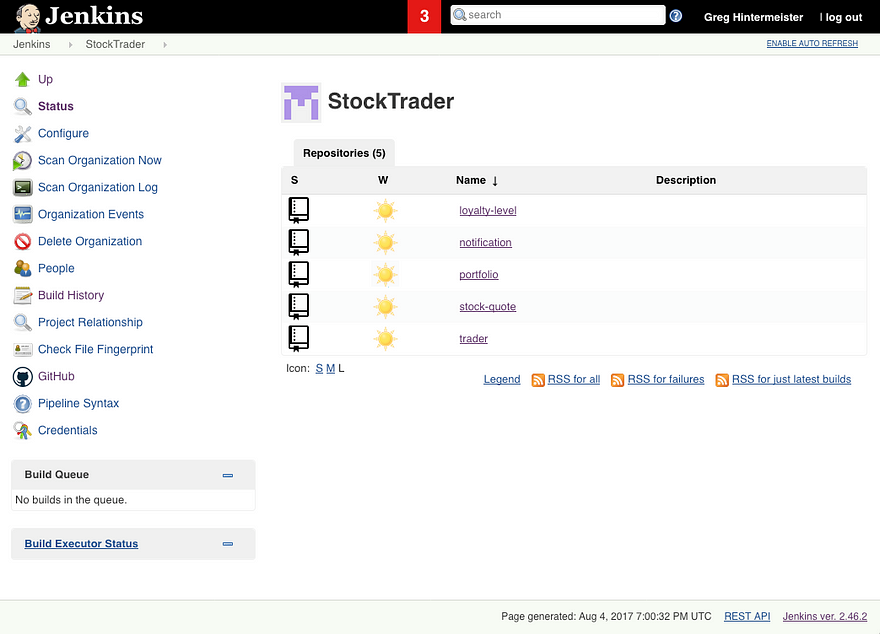
Figure 10: Microservices are built successfully.
To start, follow the instructions to install Microservice Builder here. Read it closely. There are many manual steps around authenticating the Microservice Builder pipeline with GitHub that you need to pay attention to:
https://www.ibm.com/support/knowledgecenter/en/SS5PWC/pipeline.html
To be honest, we followed these instructions and still had problems. Here are a few tips that might help to reduce these problems for you:
- Make the GitHub repos public. Microservice Builder does not work with private repositories.
- Configure IBM Cloud private so that pods can access the private Docker image registry when deploying. We missed the fact in the article and took quite some time to realize it.
- Add your entire team as “admins” when setting up Microservice Builder. We found it was difficult to add people after deployment.
- In section 4 of the steps, the instructions mentions adding single quotes around the “Master.JavaOpts” field setting. Don’t do that. This instruction is old (it’s being updated, but not changed yet). Just keep it as it is.
Finally, if you are going to try Microservice Builder with your own code, here are some tips:
- Use Maven to build. We had experience with Gradle, so needed to switch to Maven.
- Using the command “bx dev” added the proper files to your GitHub repo so Microservice Builder knows what to do with the code.
- Move your deployment.yaml into the manifest folder.
Stock Trader In Action — Through Microservices
Now lets take a peek at how we found value with all of this running. You can refer back to Figure 1 to see the application architecture. Here’s a screen shot of the trader web UI (Figure 11)
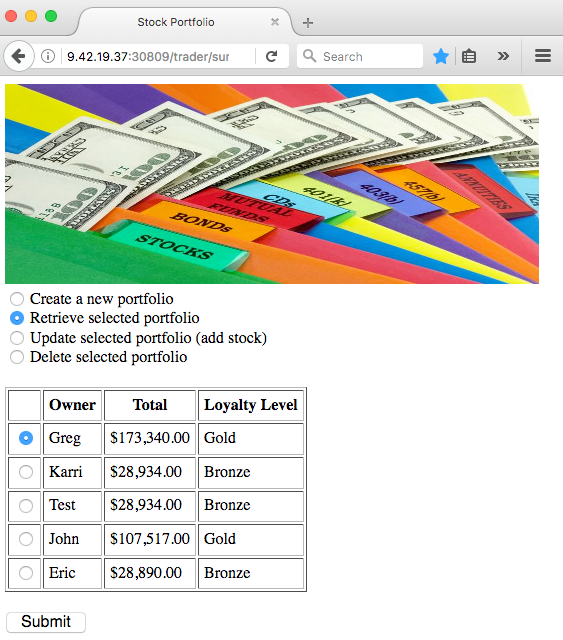
Figure 11: Stock trader app rendered from the ‘trader’ micro-service
From a web browser we connected to the “trader” micro-service that renders the simple web app. While it’s quite basic, we did want to change a few things and since it is a small micro-service, we could redeploy updates to the “trader” UI in seconds. Further, since Kubernetes handled the networking, we didn’t have to worry about changing IP addresses or DNS changes ourselves.
Another big time-saver was using the Liberty “Datasource” in the portfolio micro-service. This allowed us to switch out completely different databases (even switch between DB2, Oracle, sqlServer, etc.). All we had to do was update the db2 secret, restart portfolio, and it connected where we wanted to
As you add stock to a portfolio, the Stock Quote micro-service is contacted. It checks Redis to see if there is a local cache that is within 24 hours old, and if not, connects to quandl.com to fetch the latest stock quote. Once the portfolio is updated, the Loyalty Level micro-service is contacted which calculates if the user has reached the next level. In this case the Loyalty Level microservice determines I’ve achieved “Gold” level, so it sends a message to MQ.
As soon as the message is added to NotificationQ, the “Notification” micro-service notices it, calls OpenWhisk to trigger a message in our Slack channel. This is a great example of how a private cloud app can utilize a public cloud service while the sensitive data (the portfolio details) stays local.
Summary
We learned so much building this stock trader application. I encourage you to try it yourself, or even parts of it. In addition to the video overview, take advantage of the recipes (Db2, MQ, Secrets), and if you want to run our stock trader app (or fork it and start making changes), access it here:
https://github.com/IBMStockTrader
Good luck, and let us know what you think!
Originally published at www.ibm.com.
